Sunday 25 April 2010

DVD Studio Pro & Conclusion


Once i had my work gathered up, the next thing to do was to create my DVD menu in DVD Studio Pro.
The software is quite easy to learn and get to grips with once you know the basics. Before i started anything though i did a rough plan of a flowchart in terms of how my menu was going to be formed and organized and how everything was going to be linked page by page. This gave me a solid foundation plan to fall back on if my menu' started getting messy or unlinked.

As you can see below, i started creating my menu. Because i didn't have much time, i decided to use the preset templates of the initial menu's. This was to save time primarily and really crack on with linking the pages as that was more of a longer process.


Most of the videos of my work had to be converted into MPEG's since DVD studio can't process most types of video format.

The menu is simplified and i created basic buttons to link my pages.

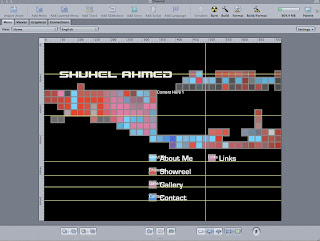
The DVD menu is complete and the work has been added to the pages. I did a little test run just to be sure everything was working fine and there was no missing link. Once i was satisfied i then burned it on a DVD.

This whole experiance of using DVD studio and creating the showreel was actually quite enjoyable in the end. There were a few problems like my laptop not being powerful enough and so at times when i was importing videos the software would slow down and it would take long to render. Learning DVD studio was pretty easy since i had some tutorials on it, there was a teacher named Alex who was teaching how to use DVD studio but for me i had the tutorial so it wasn't as nessecary as much. Overall the experiance was positive and i think if i had to improve or change anything then i would definately design my own pages of the menu's instead of using the preset template, since it's more rewarding and allows more freedom for creativity.


Work that is going into the showreel

Ok i have narrowed down my choices of work that will go into the showreel and here is a brief summary of the things to go in.

3D Animation
3D Character model: Willie Character from Industry Excercise 1
3D animated videos: Team group Sci Fi Environments, Number 2 Ident Animation, Rave Live 2 Ident Animation, Character Willie and Jelly Fish Animation.
Still images of 3D models: Occlusion rendered images of 3D Character Willie and Sci Fi environments .

Concept Work & Storyboard
Character Design: Character Willie Design and sketches.
Environments Concept: Sci Fi environments Concept by me for Team Alpha Project.
Storyboards: Live Action Compositing Storyboard and Rave Live Ident storyboards.

2D Animation
2D walk cycle.
Shoe animation.
Bouncing Ball with tail.

Live Action
Live Action Compositing film from first term work of 2nd year foundation animation.
A short film by me also produced during my spare time.

Life Drawings
Life drawings from the first year of the foundation degree.

My start on Showreel

For the Industry Excercise 3 assignment, we were given task to produce a showreel for the end of year foundation degree. The showreel will consist of all the work we have done through out our 2 years as well as incorporating work outside of this course.

I will go through all the work that i have as of now and pick out what i'm good at technically and also putting my best work up. These videos will hopefully showcase my strength and diversity in the kind of animation work i can produce.

Final Animation and Conclusion

The animation for the Rave Live 2 Ident is complete and i think it has turned out pretty solid.
Here is the rendered video below....


Conclusion
So the Ident animation is complete and its been a mixed experiance for me during this project. There were certain difficulties that i was faced with during the initial part of the ident in Maya, texturing and the lack of UV mapping of my models were one of those things. The texuring was competent but honestly not good enough. For instance the spaceship could have been textured better and made more realistic and the moon also could have had a higher resolution of texture. Secondly i felt as though the animation of the camera could have been a bit more smooth flowing. But in the end i feel as though the initial vision of this animation has been achieved from its early stage of the storyboard. I'm really happy with the models and the timing of the animation spaceship.

Working with Leonard and within a team was a positive experiance. I think our creative and collaborative ideas have really expanded our horizons in terms of how we can tell a story and whether it's technically possible to achieve what we want within the timeframe allocated. Brainstorming and storyboarding our ideas together was the most productive part of our team work. We also looked at tutorials and helped each other out technically in Maya, so overall it was a good working partnership. Our communication between both of us has also been really good since we met up regularly and gave each other feedback all the time. I think the only downside was that technically we could have spent more time together but that wasn't a major problem. So all in all it was a much better experiance this time round working in a team and it has given me confidence in future team work projects.

Working for Rave Live as our clients was a mixed experiance. I think the brief they have given us was fairly decent and what they asked us to do wasn't too much that we couldn't handle. But i felt as though at times there was no clarity to how we should export and present our Ident animation. There was a PDF file which was sent to us stating the information on how we should export but it was still confusing. In the end we had to go our other class mates who were doing this assignment to help us on this. Plus we had to hand in the work within 3 weeks so that didn't leave us any time to spare. But overall it was rewarding experiance since we managed to finish and hand in the work and also in the right format eventually. The people we are working for who we briefly met were nice people and i understand that they were busy at times so they couldn't help us at times, but again it wasn't a major problem.

In the end i learned a lot from this assignment and it was probably my best work so far this term, i know personally for me its the best i've produced so far and that is something i am quite pleased with.


Wednesday 14 April 2010

Compositing


The rendered Tiff sequences were taken into After Effects to put together. For the spaceship sequence i did a bit of glow effect on the descending pod, giving the illusion that the raw speed is visible. I also found this background image of stars that i needed for my spacehip animation since the background was black. So i just overlayed the background image under the initial animation tiff sequence. The background star image was used from this website - http://www.crestock.com/blog/photography/13-fantastic-free-wallpaper-images-80.aspx

As soon as all the scenes were rendered again from After Effects, the whole scene was edited using Final Cut Pro. Since i had a little bit of time left, i decided to put music in the animation. Completely aware of copyrights i found this website http://freeplaymusic.com/ where you can buy music and is free to use on student work. So i bought a track of this site and used in my animation. I just quickly put it in because the animation is only a few seconds.


Rendering


The whole animation is complete and texturing is also done. After a few playblast test, i was pretty satisfied with the flow of animation and since i have limited time till the deadline it was really time to push forward and begin rendering. As before, the ident animation will be rendered in two scenes. The first is the flight of the spaceship dropping off the pod near the moon and the second is the landing of the pod on the moon. Those two scenes will be rendered seperately and put together using editing software final cut pro.

Since Ravensbourne have limited computers, the animation will be rendered on my Mac Laptop as Tiff sequence and put together using After Effects.

Animating


Once the modelling and texturing were done, all that was left was to start animating. The spaceship itself was placed on a motion path to allow smooth flowing animation to the gliding model. I then had to animate the pod detatching itself from the spaceship and descending downwards to the moon. I also put one camera to follow the whole animation since cutting will just take up time and this is an ident that is going to last 10 seconds. Once the camera was animated i decided to playbast the whole animation to see how it was paced and flowed.

This playblast looks like the finish product in terms of animation and i think i will probably just tweak a little later on.


Also when the pod lands on the moon, i am going to render that as seperate scene and then put it all together in final cut pro. The reason why this scene is done seperately is because when i tried to land the pod in the other animation scene, the texture on the moon became pixelated and the moon itself just became too big and i couldn't really see anything since the size of the moon was taking all the space in maya. So i decided to do the landing of the pod in a different scene and the just put all together as one scene.

In this playblast, the pod had already landed on the moon and the pod itself finally opens to reveal the Rave live 2 logo. I'm pretty happy with playblast of this scene and i wouldn't really change anything.